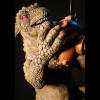
I’ve always felt that Gorgo was the
British attempt at cashing in on the success of Godzilla. And that’s
fine because it certainly didn’t keep me from loving the movie when
I saw it as a kid. Another big lizard/dino monster tearing up stuff
– COOL!!!
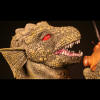
Joe Laudati’s rendering of this
creature is excellent. The likeness is spot on and the overall
design of the kit is great. He chose a great scene from the film to
recreate in 3D. My only complaint would be the connection of the
hands to the sphere and of the feet to the base. Neither area seemed
to be designed or sculpted to fit together. It was almost as if
someone else sculpted these parts without referencing the creature
so they just don’t fit well. The monster’s claws don’t really wrap
around the sphere and the toes don’t really sit well on the base.
The kit itself was a fairly clean
casting but did require some prep work. I got this kit back in the
late 90s as I recall so the casting was actually pretty good for
that time. There were some pinholes and offset seams but nothing too
terrible. The worst thing was the teeth. Many of them did not come
out in the casting. Air bubbles were trapped at the tips of the
teeth and therefore they were missing. So, after studying them for
some time, I decided to play dentist. Instead of trying to fill in
or recreate each tooth tip, I decide to just remove them completely
and start over. I Dremeled out almost all the teeth and took old
pieces of styrene sprue and carved/sanded it down to create new
teeth one at a time. It was tedious and time consuming but in the
end, I was very pleased with the result. The new teeth looked much
better than the old ones. They were irregular lengths and sharp.
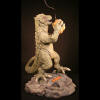
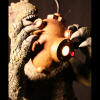
The other issue I decide to tackle
was trying to figure out how to light up the bathysphere. It just
NEEDED to be lit up. So, I broke out my drill and went at it. The
power supply and switch are in the base. The wiring runs from there
up through the base of his foot. I hid the wiring in Gorgo’s body by
running it through the leg, torso, arm and out the palm of one of
his hands into the sphere. The arm and leg were solid cast so I had
to drill perpendicular channels through those parts, run the wiring
and then putty up the holes. The torso was hollow so all I had to
there was feed the wire through. The sphere was hollow cast but the
walls were very thick, not like most hollow cast pieces. I cut the
sphere open with a Dremel cutting blade, drilled out the windows and
bored out a lot of the excess thickness to make more even if you
were to look in the windows. The glass panes were old auto headlight
lenses from my parts box. I added an antenna and an air hose made of
twisted metal rod.
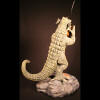
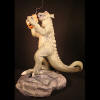
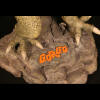
The base had to be modified because
the original was just a rocky slab about ľ” thick. I needed
somewhere to hide the battery box so I took the original piece and
raised it up on a wood frame and expanded it by adding styrofoam
covered with Durham’s Water Putty. The switch is hidden on the
backside under a ledge of rock.
The kit is painted entirely in
acrylics. I airbrushed Gorgo and punched up his highlights with dry
brushing. The base was hand painted and is covered in several layers
of varying washes.
This kit was a long project to
complete but it was well worth it. The final kit, even if built
straight out of the box, is very nice. All the extra work just makes
it even better. Give Scott over at AI a call and see if he can hook
you up with one. You won’t be sorry.